The MacView

Virtual Instrumentation from a Mac perspective

My Photo
Name:
Location: Pflugerville, TX, United States

Monday, April 22, 2013

About LabVIEW, Wait, Correction, About My App

I've had several customers creating applications with LabVIEW, and wanting to show their own About … window instead of About LabVIEW … window.

The first thing to notice, is that while you are in the editor, it will always have the "About LabVIEW …" text in the application menu. However, when you build your application, it will change to "About …" Remember that while you're running the LabVIEW editor, LabVIEW still owns the LabVIEW menu.


Even though the menu changes from "About LabVIEW …" to "About …" it still behaves like "About LabVIEW…" in your built app. The trick is to create a VI named "about.vi" and add it as an Always Included source in your application.


When "About…" is selected in your built application, your about.vi will be run. If you want behavior like LabVIEW's About window, you can just use an event structure with a Mouse Down in Pane. That way, just clicking on the front panel dismisses the About Window.

This is an image rich and text poor post, but I wanted to make it easy to scan and see what you can do to replace the About… behavior.

I believe this can be done on Windows and Linux also, but I haven't tried it.

UPDATE: Someone just pointed me to a NI Developer Zone article on the same subject (sans pictures).


Labels: , , , , ,

The views expressed on this website/weblog are mine alone and do not necessarily reflect the views of my employer.


Wednesday, February 27, 2013

Build a Standalone Mac App in LabVIEW (no need to install the Runtime)

I just posted an example VI that Installs the LabVIEW Runtime Engine into your built apps. LabVIEW has added pre/post action VIs that you can add to your Build Application Specification. This can be very useful for automating prep-work or post-build tweaks.

One thing I have found that not many people are aware of is that you can embed the Runtime Engine in your LabVIEW built application. Since applications on the Mac are just folder (right click or control-click on an app and select Show package contents) you just need to create a folder inside your built app called "Support". Put the appropriate version of the LabVIEW Runtime Engine in that folder and now there is no need to include the LabVIEW Runtime Engine Installer.
Now the Runtime Engine is quite large (159MB for 2012), and some of that is due to items that you may not need. For some things it's obvious if you need it or not (if you're not using MathScript, you can delete the MathScript framework). Some things, if you delete them, can prevent the application from launching or working correctly. The VI I cooked up not only installs the correct version of the Runtime Engine (installed on your machine) but it also removes everything that is not needed to launch a simple VI.

Another reason the Runtime Engine is large is because there may be more than one architecture in the libraries. On the Mac, you can have what is called Universal Binaries, which includes native executable code for more than one processor in the same file. We have done this in the past to allow PowerPC and Intel code coexist in the same file. Some of our libraries may contain vestigial PowerPC code. If, in the future, LabVIEW were to support 64-bit Intel, it might have both 32-bit Intel and 64-bit Intel in the same binary. This VI also goes through every library in the Runtime Engine and strips out any code that is not 32-bit Intel.

We also ship a good amount of information in LabVIEW executable code to help us diagnose problems on users machines. You probably don't need all that diagnostic code, so in addition to installing the Runtime Engine, stripping out non-32-bit executable code, the VI also strips out any information that would help in diagnosing problems.

The Install Runtime Engine.vi also zips up your .app instal a zip file right next to the app (using the maximum zip compression). That way you have a standalone application in a zip file you can email or post to a web server, ftp site, or however you want to distribute your app.

Oh, and you know those annoying .aliases and Preferences files that are always dumped next to your app? Well, this post-build step VI will also remove those for you, leaving just the app and the zip file of the app.

Use this VI as a starting point. Modify it, hack it up, improve it. Please leave comments below of any recommended improvements or cool tricks you found for post-build steps.


Labels: , , , , , ,

The views expressed on this website/weblog are mine alone and do not necessarily reflect the views of my employer.


Thursday, May 06, 2010

How To Automate Creating Large Enums

I was creating some VIs to call the OS to get system colors directly when I ran into an annoyance. The OS defines a long list of constants (in this case kThemeBrush* in Appearance.h on the Mac). I wanted an enum in my VI API to make code calling my VI more readable (right click -> create constant on the enum terminal creates an enum constant on the diagram). There were 62 enum values to enter. This was not something I wanted to type one by one into the enum control. So I came up with a way to automate much of the creation.

First I searched for all lines in Appearance.h that contain kThemeBrush and a number. I took those lines and pasted them into a string constant and then wrote some code to parse out the constant name and value (see diagram below).


So what does this diagram do? First I use vi.lib/AdvancedString/Normalize End Of Line.vi to make sure the line endings in the string are the LabVIEW platform line ending (\r on the Mac). I then use Spreadsheet String To Array primitive to parse the string into lines (one of my favorite text parsing tricks in LabVIEW). Then for each line I get the part before the equals (name of the constant) and then I get the part between the equals and the comma (constant value).

I then copy the Ring to my VI, right click on it and select Replace and replace it with an enum. LabVIEW preserves all the strings. However, to get the appropriate value (enums by default use their (zero based) index as their value) I use the output array.

The front panel of the VI has a Ring (not enum because you can't write the strings to an enum on a running VI). The constant names are written to the Ring values (Strings[]) and we output an array of the constant values. We right click on the array control and select Data Operations -> Copy Data. Then right click on the array constant in the diagram below and select Data Operations -> Paste Data.


This diagram converts the enum values to the constants from the header.

I did this for two separate API calls (Theme Text and Theme Brush), each with their own set of constants. More reliable and much faster than doing it by hand.

Labels: , ,

The views expressed on this website/weblog are mine alone and do not necessarily reflect the views of my employer.


Thursday, April 01, 2010

Threading using Queues


I found something unexpected today. I had written a VI to generate a report of the linkages between files in the LabVIEW distribution. It was a quick and dirty VI that basically did the following:

1. Find all the VIs, Controls, Classes, Libraries, Projects, etc. in the LabVIEW distribution

2. Read the linkage information from the file

3. Write out a report on the file

Here is a simplified version of what I was doing:


With this method, LabVIEW pegged the CPU at 100%. Well, LabVIEW pegged one of my four CPUs at 100%. That's great because I can do other things, but I'd like this to finish as soon as possible. So I broke the three tasks into three separate loops that communicate through Queues. Below is the code:


My code went from using 100% CPU to 250% to 270% CPU.

To use Queues to increase your threading, you need to be able to break up your code into tasks that can be run simultaneously. Usually if you are waiting for I/O, that is a good task. Here I have three disk operations (Directory Listing, Read From File, Write To File). It turns out the slowest of these is reading the linkage information from the file. So much so that the Queue of Paths stays full and the Queue of information to write remains close to empty. To help improve performance in a case like this, you can set a maximum Queue size (on the Path Queue in my case). I set the maximum size to 1,000 Paths. So the Read Link loop would always have no more than 1,000 Paths waiting for it. When it takes a Path from the Queue, the Directory Listing loop wakes up and puts another Path in the Queue.

One trick is to figure out how to end the loops. With many of the LabVIEW APIs, you can loop until the Read operation returns an error, and in the Write loop, just close the reference. With Queues that doesn't work because you may close the Queue with data still in it (1,000 Paths, for instance). So instead we send some invalid data that we would not otherwise send (Not A Path in the Path Queue instance). When each loop finishes stuffing data into the Queue, it puts an invalid element in the Queue. Then the loops that read from the Queue know to stop when they see invalid data.

I hope using this can improve the performance of your VIs. If you have any questions or improvements, please leave them in the comments.

Labels: , , , , ,

The views expressed on this website/weblog are mine alone and do not necessarily reflect the views of my employer.


Tuesday, August 12, 2008

Squeezing Parallelism Out of Your Diagrams with Merge Errors.vi


There are two different ways to run your code on multiple cores in LabVIEW, static and dynamic. We've talked about the dynamic case before, getting a reentrant reference to a VI in a loop and running it. Now I'd like to talk about some simpler methods of squeezing parallelism out of your code.

When I code, I find that I usually, for convenience, chain everything together with error clusters. So I would have one long string of actions, all tied together with an error cluster wire. It's convenient, but cuts down on LabVIEW's ability to run code in parallel. I have come to heavily use the Merge Errors.vi to help me run more code in parallel.

Merge Errors.vi has three error clusters and an array of error clusters as input, and one error cluster as output. So you fork your incoming error wire to each of the sub-VIs that can run in parallel, and then take their output and run them into Merge Errors.vi. If you have more than 3 error clusters to merge, you can also drop a build array node for the remainder.

When ordering is important, make sure the error you want to return to the user is in the first terminal. For instance the code shown below is a "destroy" VI. It must destroy the data, regardless of any errors coming in. This is like the close file primitive. You may have gotten an error while writing to the file, but you still want to close the file. However, we want to return any errors that were passed in to us, even if the destroy resulted in an error.

The bottom line is, use the Merge Errors.vi liberally in your code to handle multiple errors instead of chaining all error clusters and preventing sub-VIs from running in parallel.

Labels: , , ,

The views expressed on this website/weblog are mine alone and do not necessarily reflect the views of my employer.


Friday, August 08, 2008

Simple Preferences VIs

NIWeek was very informative. I got to talk to a lot of customers who use Macs and got a lot of feedback.

I was talking to Travis Pape (pronounced poppy) about his really cool iBike app (LabVIEW built app for Windows and Mac that allows access to iBike computer). We were talking about the difficulties he was having with preference files, and I suggested he simplify the code.

I wrote two VIs that access the OS preference mechanism. They allow you to store key/value pairs for your application. I've posted these VIs at:

http://decibel.ni.com/content/docs/DOC-1832

Another example of using vi.lib/Platform/CFString.llb and CallLibraryFunction nodes. Took about 20 minutes to look up the functions, wire it all up, and then use Polish VIs to add the documentation.

Labels: , , , , , , ,

The views expressed on this website/weblog are mine alone and do not necessarily reflect the views of my employer.


Friday, June 15, 2007

The Importance of Documentation

Sorry for the long delay in posting. Between my three-year-old twin boys, three-month-old twin girls and working hard on getting the next version of LabVIEW for the Mac in great shape, I've been a bit busy.

I've noticed recently what a difference it makes having polished VIs. By polished, I mean well documented, consistent connector panes and a general overall consistency. With all the dialogs to get at the various information and set documentation on controls/indicators and VIs it can be a bit time consuming and difficult to make sure everything is consistent, but it is worth it.

In 8.2.1, you not longer use Command-H to show/hide the contextual help window (which is the system Hide LabVIEW command), you use the Help key (or if you have a MacBook, Command-Shift-H). The contextual help window is your guide to understanding code on the block diagram.

So the places to document your VI are:

1. File -> VI Properties -> Documentation

Set the VI description to some helpful text on what the VI does and how to use it. Also create an HTML file for further documentation. You can have just one HTML file and use anchors <a name="test"> for each VI. The Help tag is the name of the anchor. (NOTE: as of 8.2.1, you must manually escape any spaces in the anchors/Help tags, for instance <a name="test me"> would have a help tag of "test%20me").

While you are in VI Properties, visit the following pages also:

- Protection: make sure the password protection/locking is how you want it.
- Execution: make sure Allow debugging and Enable automatic error handling are turned off (if desired).
- Window Appearance: Make sure the window title is what you want it to be

2. Right-click (control-click if you don't have a mighty mouse) on each control/indicator that is in the connector pane (and possibly others) and select Properties -> Documentation and make sure the description is meaningful, as well as a short description in the tip strip. Also Right-click on each control/indicator in the connector pane and make sure that its Required/Recommended/Optional is set correctly. Also make sure that all controls and indicators that you meant to have on the connector pane are there.

You probably want to visit similar controls/indicators on each VI, instead of visiting each control/indicator on a single VI. For instance, visit all the "error in (no error)" controls on all your VIs, to make sure they are named the same and have the same (or consistent) descriptions, then go on to "error out" and any other common data types. The idea is to make sure you are consistent.

3. Right-click on the following elements of your Project window and select Properties:

- Project Node (My Project.lvproj)
- Library Nodes (MyLib.lvlib)
- Class Nodes (MyClass.lvclass)
etc.

Go to the Documentation page (in the project case, its the Project Description) and fill in the information in a similar way.

Doing this has three benefits:

1. The next person who needs to modify the project (or you in 6 months) will have plenty of documentation on how it works and how to use it.

2. If you product is meant to be used by other LabVIEW developers (a library or class meant for other to use) will have an easier time learning how to use your code correctly.

3. While you document you code, you find things you missed. It forces you to think through how things actually work, and helps you find problems or missing elements.


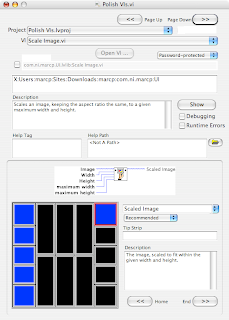
To simplify the documentation of VIs (not other project items like classes and libraries), I have written a tool that walks through all the VIs in a project and allows you to see in one place all of the VI information and allows you to update it in one place.

As you can see by clicking on the image to the right, you can easily navigate through all VIs in a project, and all terminals in a VI. You can also connect/disconnect terminals, rename terminals, add documentation to terminals and VIs, set the window title, set debugging and auto error handling and see how it all fits together in one screen.

If you are interested in trying out this tool, you can email me at Marc dot Page at NI dot com, and I will reply with a zip file containing this tool.

Labels: , , , , , , ,

The views expressed on this website/weblog are mine alone and do not necessarily reflect the views of my employer.