The MacView

Virtual Instrumentation from a Mac perspective

My Photo
Name:
Location: Pflugerville, TX, United States

Monday, August 04, 2014

LabVIEW 2014, First 64-bit Version for Mac

It has been a while since I've posted here, but with good reason. We've been really busy working on rewriting large chunks of LabVIEW for Mac 64-bit (see also Christina Roger's mention).

LabVIEW originated on the Mac APIs. Since then, LabVIEW was ported to Windows and Linux, and more modern APIs on those platforms. However, the Mac code largely remained unchanged, except for a minor rewrite for Mac OS X. When Apple switched to the NeXT based Mac OS X, they provided an API set named Carbon, which allowed for much of the pre-existing code to come across without much change. When LabVIEW was ported to Mac OS X, we took advantage of several POSIX APIs that we had battle-tested on Linux, and there were some changes to take specific use of Mac OS X, but much of the old API usages were not changed.

Then Apple decided not to port Carbon APIs to 64-bit. Apple has also deprecated much of the Carbon APIs. So we launched out to rewrite the Mac-specific sections of LabVIEW to be more modern and take advantage of Apple's new and forward looking Cocoa API. We decided the best way to do this and make sure we didn't miss anything that still called into Carbon APIs, was to port LabVIEW to 64-bit on the Mac.

We didn't want to do another minimal-port like we did when we went to Mac OS X. We wanted to fix as much as we could. We put together a terrific team of great developers on the LabVIEW team, and got to work on evaluating what needed be rewritten, what needed to change and what should stay the same. So here are some of the differences between Mac 32-bit and Mac 64-bit and VIs to help with the transition.

Fast

Depending on the operation, 64-bit LabVIEW on Mac is noticeably faster. There are a couple of corner cases where small sub-sections of the code are slightly slower, but everything else we've tested is somewhere between slightly faster to much faster. We went down to the C-Code subroutine level to compare performance between 32-bit and 64-bit to make sure we were not slowing LabVIEW down in porting to 64-bit. We were pleasantly surprised.

POSIX Paths

This was long overdue. Paths in 32-bit are formatted in HFS Classic format. 64-bit uses the more common POSIX paths. It's mostly showing slash (/) instead of colon (:) between path elements (although there is more to it than that). 

There is also a little bit of magic that happens in 64-bit when a path in a string is converted to a path type that allows either format, and then converts it into POSIX style. You can try this by copying the path from the 32-bit path indicator and paste it into the 64-bit indicator. Once focus leaves the indicator, the path will be converted to POSIX format (it's pretty fun to watch).

This magic also happens when using the String to Path primitive. You can have a string of either format and it will convert it to a POSIX path. This makes it easier to transition between 32-bit and 64-bit as you are testing your VIs in 64-bit.
Some other VIs that assist in dealing with paths between 32-bit and 64-bit are Path to Command Line String.vi and Command Line String To Path.vi in Programming -> String -> Path/Array/String Conversion palette. These VIs are helpful in building a path that can be used in System Exec.vi or system shared libraries in a cross-platform manner. They have actually existed in LabVIEW since before 2009, but are added to the palettes now to assist in transitioning between 32-bit and 64-bit on Mac.

Another path related VI that is helpful for Mac users is Executable Path To Command Line String.vi. This VI helps in getting the path to the executable in an app.
This is particularly helpful writing cross platform code that will launch LabVIEW built apps, LabVIEW itself, or other GUI applications. Windows and Linux just take the path to the EXE. On Mac, the .app is really just a folder. This VI will give you a path to the executable you can call from System Exec.vi, in a cross-platform way. This VI did not make the cut for the palettes, but you can find it in vi.lib/AdvancedString.

POSIX Line Ending

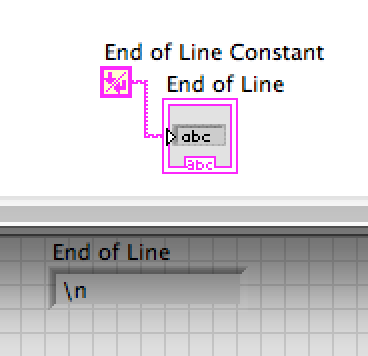
Another long overdue change was the "platform line ending." Since Mac OS X, most Mac software uses New Line (\n), however LabVIEW clung to the old Mac Classic Carriage Return (\r). The End of Line Constant (I know the icon shows New Line/Carriage Return) in the String palette returns what LabVIEW thinks is the platforms end-of-line character(s). Windows returns Carriage Return/New Line (\r\n). Linux returns New Line (\n). Mac 32-bit returns Carriage Return (\r) and Mac 64-bit return New Line (\n).
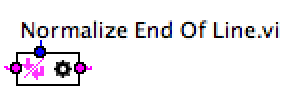
To assist in handling line endings from various environments, we now have Normalize End Of Line.vi in the String palette. This VI has shipped with LabVIEW since before LabVIEW 2009, but is now available in the palettes. This VI takes a string and converts all the line endings in the string to a standard end of line. That way, no matter what the source of the string (Windows, Linux, Mac LabVIEW 32-bit, etc), you can normalize the end-of-lines in the string and then parse the string regardless of the source.

AESend is Dead, Run AppleScript Code Instead

LabVIEW used to communicate with other applications on the Mac using Apple Events via AESend family of VIs. We have removed those from the palettes and added Run AppleScript Code.vi (in Connectivity -> Libraries & Executables next to System Exec.vi). AppleScript is easier for most people to use, and you can test the code in Apple's AppleScript Editor app. The AESend family of VIs still ships with LabVIEW, but is deprecated and we encourage users to move to Run AppleScript Code.vi (NOTE: LabVIEW 2014, both 32-bit and 64-bit, shipped with a crash when running the AESend family of VIs. This is expected to be fixed in a future version). The AESend family of VIs will not work in 64-bit.

Unicode / UTF-8

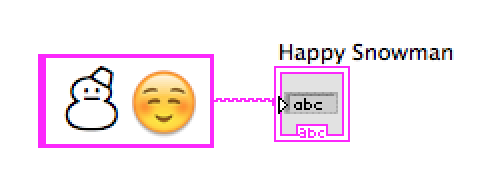
Mac LabVIEW 64-bit is the first LabVIEW that supports Unicode. When displaying, entering, copying, pasting, etc. strings, 64-bit LabVIEW assumes all the data is UTF-8. This has several ramifications. First, you can put emoticons in text. Pretty cool, but not that helpful. The other implication is that now there is no limit to what languages you can use for file/folder names (this ones for you, Socrates). In LabVIEW 32-bit on Mac, we had users who would name their hard drive something meaningful in their native language, which LabVIEW would then choke on and report it couldn't open the VI. LabVIEW 64-bit, because all strings are UTF-8, can handle any language in the path.
CINs are gone, use Call Library Function Node

On all 64-bit LabVIEW platforms, CIN is no longer supported. All of the functionality is available via the Call Library Function Node (in Connectivity -> Libraries & Executables next to System Exec.vi). Since Apple supports Universal Libraries, LabVIEW on Mac does nothing special to differentiate between 32-bit and 64-bit in library names. If you have a framework or dylib that you want to call into from both 32-bit and 64-bit, make sure it is a universal binary. You can use the lipo command line tool to merge binary code from 32-bit and 64-bit into a universal binary.

Miscellaneous

There are separate installers for LabVIEW 32-bit and 64-bit on the Mac LabVIEW media. We recommend you install both, as not all NI toolkits and addons are available for 64-bit yet.
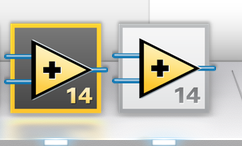
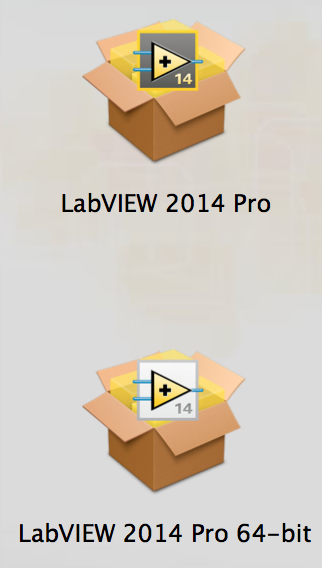
The Dock icon differs between 32-bit and 64-bit. Think of it as Coal (32-bit) and Solar (64-bit). The icons now also have the LabVIEW version on them. This makes it easier to tell the difference and switch between them when working with both simultaneously.


LabVIEW 32-bit is still in /Applications/National Instruments/LabVIEW 2014 folder. LabVIEW 64-bit is in a sibling folder named LabVIEW 2014 64-bit.

I encourage you to try out LabVIEW 64-bit and leave me a comment below as to what other differences you have found.


Labels: , , , , ,

The views expressed on this website/weblog are mine alone and do not necessarily reflect the views of my employer.


Monday, April 22, 2013

About LabVIEW, Wait, Correction, About My App

I've had several customers creating applications with LabVIEW, and wanting to show their own About … window instead of About LabVIEW … window.

The first thing to notice, is that while you are in the editor, it will always have the "About LabVIEW …" text in the application menu. However, when you build your application, it will change to "About …" Remember that while you're running the LabVIEW editor, LabVIEW still owns the LabVIEW menu.


Even though the menu changes from "About LabVIEW …" to "About …" it still behaves like "About LabVIEW…" in your built app. The trick is to create a VI named "about.vi" and add it as an Always Included source in your application.


When "About…" is selected in your built application, your about.vi will be run. If you want behavior like LabVIEW's About window, you can just use an event structure with a Mouse Down in Pane. That way, just clicking on the front panel dismisses the About Window.

This is an image rich and text poor post, but I wanted to make it easy to scan and see what you can do to replace the About… behavior.

I believe this can be done on Windows and Linux also, but I haven't tried it.

UPDATE: Someone just pointed me to a NI Developer Zone article on the same subject (sans pictures).


Labels: , , , , ,

The views expressed on this website/weblog are mine alone and do not necessarily reflect the views of my employer.


Friday, March 08, 2013

More Magic with Post-Build Steps

I'm in a Post-Build magic mood. I was chatting with a LabVIEW user who wanted to have a drag and drop install experience for their LabVIEW built app. My previous post about merging the LabVIEW Runtime Engine into your built app is part of the puzzle. The magic he was looking for was creating one of those spiffy .dmg files with a background image giving instructions to drag-and-drop onto a symlink to /Applications folder.

This gave rise to my DMG Post-Build Step. It's really not meant to be a Post-Build step, but an example of using the DMG and Finder VIs I wrote. You can combine these VIs into an amalgamation of the LabVIEW Runtime Engine Merge, the example DMG step here and your own magic.

The idea is that you can mix and match the parts to do what you need to get done for your project. In the example I've included in the project, it builds a Read/Write .dmg (which is required to arrange it correctly) and then a Read-Only, Compressed .dmg for distribution.

The .dmg tools allow you to create DMGs, mount and unmount them and convert them to other formats. The convert VI allows you to convert any .dmg to two difference compressed formats (pre-10.4 compatible and a 10.4+ that has better compression), Read/Write, ISO (for CD/DVD Burning) and Sparse (disk image size on disk grows as contents of disk image grow).

After creating the .dmg tools, I realized there was some somewhat tricky things I needed to do in the Finder to get things to look just right. Luckily the lingua franca of the Finder is AppleScript, and LabVIEW just happens to ship with a VI to run AppleScripts, at vi.lib/Platform/Run AppleScript Code.vi. Also lucky for us, AppleScript's native path format is Classic Mac (ie Macintosh HD:Users:labview vs POSIX /Users/labview).
Above is the contents of Set Finder Item Position.vi. It calls Open Finder Window.vi to make sure the window is open in the Finder, and Close Finder Window.vi at the end. The Finder is particular about when it will persist changes made via AppleScript. Goofy things like opening and closing windows can make a difference.

Speaking of which, you'll notice that in the example Post-Build VI (Create App DMG.vi), we open the Finder Window (and don't close it) right before we unmount the Read/Write .dmg file. After reading the tea-leaves on the internet (or at least my poor recollection of reading them) reveals that in order for the Finder to persist the position changes made, you need to have the window(s) open when you unmount.
So with all those magic AppleScript incantations and tweaking the sizes and positions until it is just right, when you build, the output directory will have your application (as well as the Preferences and .aliases files) along with a Read/Write .dmg file (helpful for debugging positions, etc.) and the final, compressed .dmg.

When you double-click on the Read/Write .dmg file, you'll need to find the disk to open it (Finder -> Go -> Computer). However the Compressed .dmg file will open it's window when double-clicked. Not only does it open, but it opens in the top-left corner (with a little space from the edge of the screen), it shows my background image (you can have any .jpg file you want there) and my application (with the extension hidden).

My Finder tools do have some limitations (and someone may want to modify/extend them). They only work on Icon View (list, column, etc are not supported). I've hard-coded the following behaviors: no side bar, no status bar, no tool bar, no item info shown, no icon preview shown, icons are not arranged and the label position is at the bottom of the icons. The Set Finder Icon Window Options.vi was intended to give you just the tools you need to create the customary .dmg drag/drop install.

Oh, and I did omit creating the symlink to /Applications folder. I'll leave that as an exercise for the reader, but I'll give you some hints: System Exec.vi and ln -s /Applications /Volumes/Example/Applications, just don't forget to build the path for /Volumes/Example/Applications from the root path passed out of Create DMG.vi and of course, don't forget Path to Command Line String.vi to get it in POSIX format.

Happy app building!


Labels: , , , ,

The views expressed on this website/weblog are mine alone and do not necessarily reflect the views of my employer.


Wednesday, February 27, 2013

Build a Standalone Mac App in LabVIEW (no need to install the Runtime)

I just posted an example VI that Installs the LabVIEW Runtime Engine into your built apps. LabVIEW has added pre/post action VIs that you can add to your Build Application Specification. This can be very useful for automating prep-work or post-build tweaks.

One thing I have found that not many people are aware of is that you can embed the Runtime Engine in your LabVIEW built application. Since applications on the Mac are just folder (right click or control-click on an app and select Show package contents) you just need to create a folder inside your built app called "Support". Put the appropriate version of the LabVIEW Runtime Engine in that folder and now there is no need to include the LabVIEW Runtime Engine Installer.
Now the Runtime Engine is quite large (159MB for 2012), and some of that is due to items that you may not need. For some things it's obvious if you need it or not (if you're not using MathScript, you can delete the MathScript framework). Some things, if you delete them, can prevent the application from launching or working correctly. The VI I cooked up not only installs the correct version of the Runtime Engine (installed on your machine) but it also removes everything that is not needed to launch a simple VI.

Another reason the Runtime Engine is large is because there may be more than one architecture in the libraries. On the Mac, you can have what is called Universal Binaries, which includes native executable code for more than one processor in the same file. We have done this in the past to allow PowerPC and Intel code coexist in the same file. Some of our libraries may contain vestigial PowerPC code. If, in the future, LabVIEW were to support 64-bit Intel, it might have both 32-bit Intel and 64-bit Intel in the same binary. This VI also goes through every library in the Runtime Engine and strips out any code that is not 32-bit Intel.

We also ship a good amount of information in LabVIEW executable code to help us diagnose problems on users machines. You probably don't need all that diagnostic code, so in addition to installing the Runtime Engine, stripping out non-32-bit executable code, the VI also strips out any information that would help in diagnosing problems.

The Install Runtime Engine.vi also zips up your .app instal a zip file right next to the app (using the maximum zip compression). That way you have a standalone application in a zip file you can email or post to a web server, ftp site, or however you want to distribute your app.

Oh, and you know those annoying .aliases and Preferences files that are always dumped next to your app? Well, this post-build step VI will also remove those for you, leaving just the app and the zip file of the app.

Use this VI as a starting point. Modify it, hack it up, improve it. Please leave comments below of any recommended improvements or cool tricks you found for post-build steps.


Labels: , , , , , ,

The views expressed on this website/weblog are mine alone and do not necessarily reflect the views of my employer.


Thursday, June 03, 2010

How to Get All Mac System Colors in LabVIEW

Christina Roger's blog posts over at Eyes on VIs (specifically Secret LabVIEW System Colors and System Colors - Don't Believe Your Eyes) got me looking into the System Colors on the Mac. In doing so I wrote some VIs to query the OS directly (at least on the Mac) what all the system colors are. You can download the VIs at:

Mac System Color VIs

Both the Text Color API and the Brush Color API are very similar. They differ only in the function to call (duh) and the constants passed for what color to get. Here is GetThemeBrushAsColor.vi's block diagram:


My last post talked about converting a list of constants into an enum. I used this method (for both API calls) to create the enum input. For the RGBColor input, I just used an array of three Unsigned 16-bit Integers (Red, Green and Blue in that order in the array). The trickiest part was how to convert three u16s to a LabVIEW color code. LabVIEWs colors are an Unsigned 32-bit integer. The least significant byte is the Blue value. The next most significant byte is the Green value and the next most is the Red value, in other words: 0x00RRGGBB. The most significant byte is where LabVIEW stores magic flags, so we'll keep that zero. To convert from 16-bit values to 8-bit values, we just need the upper half of the 16-bit values. So we use Split Number primitive to get the upper half of the 16-bit values and use Join Numbers to put the colors in the right places.


Then it's just a matter of getting the Call Library Function primitive set up correctly. There you go. Simple call to get all sorts of colors from the OS.

Labels: , , , ,

The views expressed on this website/weblog are mine alone and do not necessarily reflect the views of my employer.


Thursday, April 01, 2010

Threading using Queues


I found something unexpected today. I had written a VI to generate a report of the linkages between files in the LabVIEW distribution. It was a quick and dirty VI that basically did the following:

1. Find all the VIs, Controls, Classes, Libraries, Projects, etc. in the LabVIEW distribution

2. Read the linkage information from the file

3. Write out a report on the file

Here is a simplified version of what I was doing:


With this method, LabVIEW pegged the CPU at 100%. Well, LabVIEW pegged one of my four CPUs at 100%. That's great because I can do other things, but I'd like this to finish as soon as possible. So I broke the three tasks into three separate loops that communicate through Queues. Below is the code:


My code went from using 100% CPU to 250% to 270% CPU.

To use Queues to increase your threading, you need to be able to break up your code into tasks that can be run simultaneously. Usually if you are waiting for I/O, that is a good task. Here I have three disk operations (Directory Listing, Read From File, Write To File). It turns out the slowest of these is reading the linkage information from the file. So much so that the Queue of Paths stays full and the Queue of information to write remains close to empty. To help improve performance in a case like this, you can set a maximum Queue size (on the Path Queue in my case). I set the maximum size to 1,000 Paths. So the Read Link loop would always have no more than 1,000 Paths waiting for it. When it takes a Path from the Queue, the Directory Listing loop wakes up and puts another Path in the Queue.

One trick is to figure out how to end the loops. With many of the LabVIEW APIs, you can loop until the Read operation returns an error, and in the Write loop, just close the reference. With Queues that doesn't work because you may close the Queue with data still in it (1,000 Paths, for instance). So instead we send some invalid data that we would not otherwise send (Not A Path in the Path Queue instance). When each loop finishes stuffing data into the Queue, it puts an invalid element in the Queue. Then the loops that read from the Queue know to stop when they see invalid data.

I hope using this can improve the performance of your VIs. If you have any questions or improvements, please leave them in the comments.

Labels: , , , , ,

The views expressed on this website/weblog are mine alone and do not necessarily reflect the views of my employer.


Friday, August 08, 2008

Simple Preferences VIs

NIWeek was very informative. I got to talk to a lot of customers who use Macs and got a lot of feedback.

I was talking to Travis Pape (pronounced poppy) about his really cool iBike app (LabVIEW built app for Windows and Mac that allows access to iBike computer). We were talking about the difficulties he was having with preference files, and I suggested he simplify the code.

I wrote two VIs that access the OS preference mechanism. They allow you to store key/value pairs for your application. I've posted these VIs at:

http://decibel.ni.com/content/docs/DOC-1832

Another example of using vi.lib/Platform/CFString.llb and CallLibraryFunction nodes. Took about 20 minutes to look up the functions, wire it all up, and then use Polish VIs to add the documentation.

Labels: , , , , , , ,

The views expressed on this website/weblog are mine alone and do not necessarily reflect the views of my employer.


Monday, April 21, 2008

Its The Little Things

First off, talking of little things, my girls are now a year old. For those of you who have twins know, this is about when things start to get easier. The fog lifts and you start to get a life back. I am getting close to completing my work on the next version of LabVIEW. That means I should have more time to post here.

Its the little touches that make the Mac OS a pleasure to use. Since I joined the LabVIEW team back in the LabVIEW 7.0 days, I have tried to add a little special Mac something to the release. Unfortunately, due to several circumstances, I will not be able to do that for the next release of LabVIEW.

Stephen Covey, in his book The 7 Habits of Highly Effective People talks about sharpening the saw. In other words, stop every once in a while and evaluate your efficiency and take some time to become more efficient. We are doing that with the Mac build of LabVIEW, which means the next release will not have the bells and whistles I would like to have in it.

To lament this, I wanted to publicly remind myself of the cool little Mac features I have been able to get into LabVIEW since 7.0. I hope there are also some things in here that you didn't know, and can now be more productive in LabVIEW. (Warning: These features are currently Mac only. Using LabVIEW on Windows may get frustrating after getting used to these features on a Mac.)

Go To LabVIEW Folder

I was fixing a problem with the file dialog box, when I started to get annoyed with trying to find the LabVIEW folder of the LabVIEW I was currently running (I have several versions of LabVIEW scattered all over my hard drive). So I added a button to the Open File dialog (if it treats LLBs as folders) that will allow you to go directly to the currently running LabVIEW's folder.

Horizontal Scrolling

LabVIEW supported the scroll wheel on the mouse on Windows before it was supported on the Mac. One day I got very annoyed that the scroll wheel did nothing in LabVIEW on the Mac, so I added scroll wheel support. Now that only brought us on parity with Windows, so I went a step further and added horizontal scrolling and fast scrolling. When the Mighty Mouse came out, LabVIEW worked in all directions. However, if you do not have a Mighty Mouse, you can scroll horizontally by holding down the shift key and using the scroll wheel. Fast Scrolling support is enabled (horizontal and vertical) by holding down the option key. It will double the scroll speed.

LabVIEW Version on Dock Icon

Note: This appears not to be compatible with Leopard. I don't know that this will be fixed in time for the next release.

If you set "BadgeAppInDock: True" in your LabVIEW preferences file, the version of LabVIEW will show up on the LabVIEW icon in the dock after you launch (you may have to click on it for it to show up). I never got it working quite right (and apparently it doesn't work for Leopard) so we left it in behind a preference setting. The version number on the icon should survive LabVIEW quit, however, it will be cleared after the Dock is restarted.

Flexible Preference File Format

The "style" of preference files for LabVIEW varies between the platforms. For instance, Windows has a "key=value" format and the Mac has a "key: value" format. I made the Mac preferences file format much more flexible, so line endings don't matter (DOS, Mac Classic or UNIX line endings will work), and equals (=) and colon (:) will work. By default, LabVIEW on Mac will write out the "key: value" format, but can read either format.


Command Line Path Strings

This isn't really a Mac specific feature, its more of a Mac necessitated workaround. I added two VIs at /AdvancedString: Command Line String To Path.vi and Path To Command Line String.vi. These VIs look and behave very similar to String to Path and Path to String primitives, and are drop in replacements for them. In fact, on every other platform, they behave exactly the same as their primitive counterparts. On the Mac, however, they convert between Mac classic paths (colon separated) and UNIX paths (slash separated).

The diagram shown here can convert symlinks into the path they represent (the Get File Info primitive does this a lot better). Notice the pink on the Path/String conversion bullets. They are the AdvancedString versions.

Use these VIs whenever you are interacting with the command line. This will make your VIs more portable among platforms.

I know I am forgetting a few other features, but these are the ones that have remained in my memory after my year of no sleep.

Labels: , , ,

The views expressed on this website/weblog are mine alone and do not necessarily reflect the views of my employer.


Tuesday, June 26, 2007

What ZFS support means

There have been a lot of ramblings about ZFS support in Leopard. Many people have wondered what the big deal is, and how it would help the average Mac user. Personally, I was just waiting for Steve Jobs to say the words "boot ZFS" and my life would have been compelte (well, not really, but it would have been pretty cool).

First, a little history (as I remember it, so it may not be completely accurate, but its close enough). The first filesystem (the way files are stored on disk) on the Macintosh was MFS (Multiple File System). MFS was very short lived (I have never actually used it, just heard about it). It did not have hierarchical file system (no folders). HFS (Hierarchical File System) replaced MFS pretty quickly. HFS was written when most people still booted off of 3.5" floppy disks (1.44 MB max) and computer RAM was measured in kB not GB. Then Apple upgraded HFS to HFSPlus. It handled much bigger drives, supported Unicode better and was just overall a better, more modern filesystem. The last little tweak Apple did to HFSPlus was to add journalling support (the filesystem better handled unexpected power outages).

The Sun develops an incredible filesystem, ZFS (Zetabyte File System).


  1. Adding more disk space is easy

    Right now, there are one or more logical disks for every physical disk. Most people are familiar with Macintosh HD which is a logical disk (Macintosh HD on the desktop) and a physical disk (say, a Western Digital inside their Mac). You can partition a physical disk into multiple logical disks. I have done this with a 250 GB external firewire drive. I have a different Mac OS version on each of (now 5) partitions, or logical disks.

    ZFS takes that trend in the reverse direction. You can have multiple physical disks "pooled" together into one logical disk. Imagine the following: you are running out of disk space, so you buy a new, much bigger hard drive. You install it and format it, and now you have two options: (1) migrate everything to the new drive, or (2) do some UNIX command lines to hobble the new disk into the filesystem on the old disk (sym-links, moving the home directory, etc). Neither of these is very clean, and both make things feel like the system is fragile.

    If your main hard drive had been formatted ZFS, you could do the following instead: Tell the OS to add the new drive to the "pool" of drive space available. That's it. The logical disk, Macintosh HD on your desktop, would now have the full storage capacity of both physical disks in your system. You can add as many drives as you can connect to your machine.

  2. Speed benefits of RAID, but in a simpler package


    The idea of "pooling" physical disks together for the logical disk has another benefit that is similar to the speed concepts in RAID. When you write data, you split the data between multiple disks. Then when you read it, both disks work as fast as they can to get their piece of the data requested. This is similar in concept to multiple CPUs (cores) in Macs today. If you can have two or more things sharing the load, you can make it faster.

  3. Failing disks can be detected sooner


    The problem with using multiple disks, is that your risk of disk failure goes up dramatically. Instead of a 5% that one disk will fail, you have a 10% chance that one of the two disks will fail (ok, I don't remember my statistics, or at least didn't want to think too hard about it, but you get the idea). Some RAID schemes solve this problem by storing just enough shared data on the disks, that if one drive goes down, it can continue to give you correct data (although slower) until you replace the drive.

    ZFS has a RAID mode, but you have to have all the disks be the same size. Standard ZFS has a cool feature though. Every block of data that is written, has a checksum written with it. Every time a block is read, it checks to make sure that checksum is correct. As soon as it finds a bad block, you can tell it to remove the bad disk from the "pool" (which will copy the data onto the remaining disks) and then replace the bad disk. You get very early detection of a failing disk, and should lose less data.

  4. Compression is built into the filesystem


    Back in the dark days Back when I used a PC and DOS, there was a cool program called Stacker (later Microsoft had a very similar feature). It allows you to reformat a disk and use compression to get more disk space. ZFS brings this back.

    With ZFS, you can turn compression on or off at any moment. While it is on, any data written to disk will be compressed. When off, data is written in raw, uncompressed format. When reading, it will read whatever format was written, compressed or uncompressed.

    You may thing that adding compression would slow down the filesystem, but it actually speeds it up. Processor and memory speeds have been growing at a much faster pace than disk speeds. So the little bit of time it takes to compress/uncompress the data is nothing compared to the time it takes the disk to read or write the data.

  5. Entire "Disk" revision history available


    ZFS has a feature called snapshots. This allows you to create a special "directory" (really a file) that is a snapshot of the filesystem at that moment in time. Think of it as a live, whole system Time Machine, without the external disk.

    This snapshot "directory" takes next to no time to create (there's nothing to copy), and takes up very minimal space. Basically, whenever you modify a file, the old one is kept in the snapshot. Any files that have not been changed since the snapshot are shared between the two. Its kind of like a whole filesystem diff.

    Imagine working on a project, and you get to a cross-road. A decision on direction is needed. You choose what you think is the best direction, but want to get back to the point your at in your project just in case. The code may not be to a point that you can put it in source code control, so you right click on the folder and select Create an Archive and make a zip file of the "snapshot". If it is a large project, you go to lunch and come back just as it finishes archiving it. You continue on and then realize that it is not the direction you really wanted to go. You unzip your snapshot zip file (again, going to lunch), and only then realize that you missed some files in another folder.

    With ZFS, just take regular snapshots of the entire filesystem. They are quick, small and capture the state of the entire filesystem.

    NOTE: Snapshots are not a replacement for backups. If your system gets fried, you lose your snapshots and your data. Backups, like with Time Machine, are extremely valuable and everyone should have a backup strategy.


So what is Apple's plan with ZFS? Nobody but Apple (maybe even Steve Jobs) really knows, but here is what we do know. Leopard has had some limited support for ZFS. They are stated that Leopard has "read only" support for ZFS (at least the beta the just handed out at WWDC has read only ZFS). MacRumors has posted that Apple is giving developers a beta of read-write ZFS as a separate download.

What I am looking forward to is when Apple replaces Journaled HFSPlus with ZFS as the default filesystem. That means they still need a non-beta read-write filesystem that you can boot Mac OS X off of (booting of ZFS is a fairly new feature on any OS).

So I hope the clamor for ZFS grows and Apple listens. I love HFSPlus, but I have a feeling I would love ZFS a whole lot more.

Labels: , , , , , , ,

The views expressed on this website/weblog are mine alone and do not necessarily reflect the views of my employer.


Friday, June 15, 2007

The Importance of Documentation

Sorry for the long delay in posting. Between my three-year-old twin boys, three-month-old twin girls and working hard on getting the next version of LabVIEW for the Mac in great shape, I've been a bit busy.

I've noticed recently what a difference it makes having polished VIs. By polished, I mean well documented, consistent connector panes and a general overall consistency. With all the dialogs to get at the various information and set documentation on controls/indicators and VIs it can be a bit time consuming and difficult to make sure everything is consistent, but it is worth it.

In 8.2.1, you not longer use Command-H to show/hide the contextual help window (which is the system Hide LabVIEW command), you use the Help key (or if you have a MacBook, Command-Shift-H). The contextual help window is your guide to understanding code on the block diagram.

So the places to document your VI are:

1. File -> VI Properties -> Documentation

Set the VI description to some helpful text on what the VI does and how to use it. Also create an HTML file for further documentation. You can have just one HTML file and use anchors <a name="test"> for each VI. The Help tag is the name of the anchor. (NOTE: as of 8.2.1, you must manually escape any spaces in the anchors/Help tags, for instance <a name="test me"> would have a help tag of "test%20me").

While you are in VI Properties, visit the following pages also:

- Protection: make sure the password protection/locking is how you want it.
- Execution: make sure Allow debugging and Enable automatic error handling are turned off (if desired).
- Window Appearance: Make sure the window title is what you want it to be

2. Right-click (control-click if you don't have a mighty mouse) on each control/indicator that is in the connector pane (and possibly others) and select Properties -> Documentation and make sure the description is meaningful, as well as a short description in the tip strip. Also Right-click on each control/indicator in the connector pane and make sure that its Required/Recommended/Optional is set correctly. Also make sure that all controls and indicators that you meant to have on the connector pane are there.

You probably want to visit similar controls/indicators on each VI, instead of visiting each control/indicator on a single VI. For instance, visit all the "error in (no error)" controls on all your VIs, to make sure they are named the same and have the same (or consistent) descriptions, then go on to "error out" and any other common data types. The idea is to make sure you are consistent.

3. Right-click on the following elements of your Project window and select Properties:

- Project Node (My Project.lvproj)
- Library Nodes (MyLib.lvlib)
- Class Nodes (MyClass.lvclass)
etc.

Go to the Documentation page (in the project case, its the Project Description) and fill in the information in a similar way.

Doing this has three benefits:

1. The next person who needs to modify the project (or you in 6 months) will have plenty of documentation on how it works and how to use it.

2. If you product is meant to be used by other LabVIEW developers (a library or class meant for other to use) will have an easier time learning how to use your code correctly.

3. While you document you code, you find things you missed. It forces you to think through how things actually work, and helps you find problems or missing elements.


To simplify the documentation of VIs (not other project items like classes and libraries), I have written a tool that walks through all the VIs in a project and allows you to see in one place all of the VI information and allows you to update it in one place.

As you can see by clicking on the image to the right, you can easily navigate through all VIs in a project, and all terminals in a VI. You can also connect/disconnect terminals, rename terminals, add documentation to terminals and VIs, set the window title, set debugging and auto error handling and see how it all fits together in one screen.

If you are interested in trying out this tool, you can email me at Marc dot Page at NI dot com, and I will reply with a zip file containing this tool.

Labels: , , , , , , ,

The views expressed on this website/weblog are mine alone and do not necessarily reflect the views of my employer.


Friday, January 19, 2007

The Revolution WILL be televised

Apple Computer announced $1 billion profit on over $7 billion in revenue. IDC announced Apple's computer market share went up almost 30% year-on-year (now 4.7%). With all the buzz of the iPhone and iPod line, and Apple dropping the "Computer" from its name, some of us Mac fans are left to wonder what this all means.

The iPod went from zero to hero in no time, and they continue to grow. The holiday quarter 2006 saw 50% more iPods being sold than the same quarter 2005. With AppleTV, iPhone and iPod Apple gets a lot of buzz, but its the Macintosh that is most interesting here. I think there is a quiet revolution happening.

A popular book here at National Instruments is Crossing the Chasm. In this book, the author discusses a Technology Adoption Model (image at link shown here) that is very helpful in understanding future directions in technology.

The theory goes like this:

  • Innovators are always on the bleeding edge in accepting new technology
  • Early Adopters quickly follow the Innovators
  • If the Early Majority accepts the new technology, then Late Majority will shortly follow
  • There are always Laggards that are the last to accept the new technology


The Macintosh never really got past the Early Adopters phase. That is the "chasm" referred to in the book. The iPod showed that Apple could cross that chasm. With one win under their belt, I think the iPhone and AppleTV are the next tests of their new model. But what about the Macintosh.

Another technology adoption model is the Alpha Geek model. This model states that when a majority of Alpha Geeks adopt a technology, the rest public at large will eventually follow. I think the IBM PC is a good example of this.

In the mid 80's home computers became popular. You had the Atari, Commodore, TRS, IBM, Amiga and Apple camps. The Alpha Geeks we split among them all. So when people asked their Alpha Geek friend which computer to buy, the advice depended on who your Alpha Geek was. Then as the PC became more popular among Alpha Geeks, their advice started converging on the PC, thus a shift in the Alpha Geek preference multiplied the effect on the general population.

Ten years ago, if you were to poll Alpha Geeks you would have found that 90% to 95% of them used Microsoft Windows. Anecdotal evidence over the last 10 years leads me to believe that another shift in Alpha Geek preference is happening, towards the Macintosh.

I started to notice a change on Slashdot about the time Mac OS X was released. Slashdot ten years ago seemed to be more Linux oriented. Since then more and more posts were Apple related. Not only that, the posts became increasingly pro Apple.

When I started working for National Instruments in 1997, there were just a handful of people who I worked with who had a Mac at home, and they were very, what we called at the time, Apple Evangelistas. Within the last few years, I have noticed that the developers I work with are starting to buy Macs for home use. Even more surprising is that the developers who are buying Macs are not Mac zealots. They are people who have been working on Windows versions of LabVIEW or DAQ, and really don't have much exposure to the Mac other than casual exposure. In fact, just this morning, another developer who I never thought would buy a Mac came up to me and said, "I have a MacBook Pro in my cart at the Apple store, and before I submitted the order, I just wanted to ask you about one of the features."

The third anecdote comes from my personal history. I was an IBM PC guy in high school (DOS days). I had even (ignorantly) talked a friend into being anti-Mac (his family was trying to decide between Mac and PC at the time). Then I started working for the Navy. They had me working on a Macintosh, and I grew to love it. However, this made me a geek black sheep of sorts in my family. My father tried to convince me that a Sparc station (from Sun) would be a better alternative to Microsoft.

When I went off to college, my parents bought me a Compaq PC (sometimes I think it was for fear that I might buy a Mac at college). I used the computer for about a year and a half. It was a useful tool, and it was free (for me). Then I got married. I was frustrated that my new wife had such a difficult time using our home computer. We decided it was time to sell the PC and get a Mac. Since then, I've purchased 6 Macs, and got my mother-in-law 2 Macs.

I was still a geek black sheep in my family. My two brothers were Windows/Linux fans. None of the male members of my immediate family had anything good to say about the Macintosh. Well, at least until the Mac switched to Intel. I was floored when my father and two brothers, and different times, expressed that they would consider buying a Mac.

I think that in the next ten years, we are going to see a personal computer revolution, and it WILL be televised (at least web-cast).

Labels: , , , , ,

The views expressed on this website/weblog are mine alone and do not necessarily reflect the views of my employer.